
ClassiPress Child Theme Tutorial (Part 2)
Before attempting this tutorial, you should have already read and completed the “ClassiPress Child Theme Tutorial Part 1“. Assuming you have done this you will already have a folder for your child theme which leaves us right where we left off.
What we will Cover in Part 2
- Creating the functions.php file.
- Overwriting an existing function (the prices function in this tutorial).
- Creating your own new function in the function file.
- Use the child theme to modify the index-directory.php file so that our homepage is modded.
- Build a new dashboard template to show confirmation messages and activate it.
Step 1: Creating the functions.php file
Navigate to the child theme folder you previously created. Now we need to create a new file in it. You can do this a variety of ways, but we are going to use a technique that is the most “universal”.
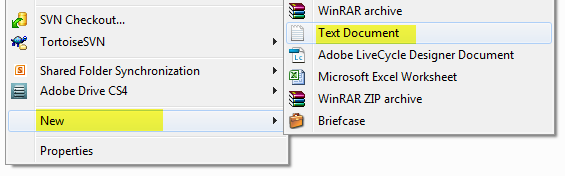
Open your child theme directory, right-click, and choose “New->Text Document”.
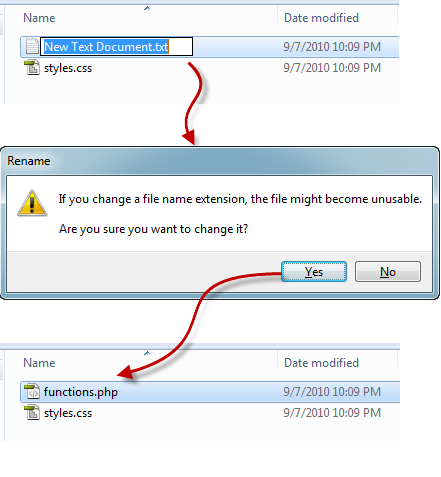
Now name the document functions.php making sure the click YES to the prompt that asks if you would like to change the file extension.
You have now created your child themes functions file and are ready to move on to step 2.
Step 2: Overwriting an existing function
Open your functions.php file in a text editor program (notepad, notepad+, Textpad, Dreamweaver, etc). Next we need to prepare the file for PHP code so copy the following code and paste it into the file:
<?php
/**
 * Write your own functions or modify functions, actions, and filters using this file.
 * LIST YOUR FUNCTIONS (optional):
 * cp_import_wp_childstyle() [CUSTOM]
 * cp_get_price() [OVERWRITE]
 */

//Place All Your Custom Function Below This Line

//Do not place any code below this line.
?>
For this tutorial we are providing you with a function that will enforce good currency formatting based on USD (United States Dollars Currency). Before we have you implement this function we want to get a sample ad setup with “bad currency formatting” that we want to block from being displayed.
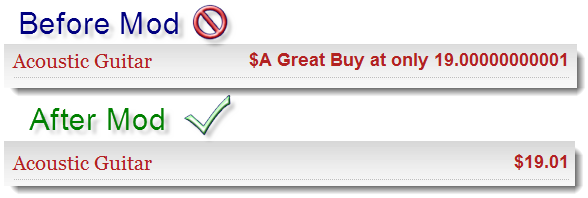
So now lets create a new “ad listing” by clicking on the “Post an Ad” link. You can put whatever you want in all the required fields, but please make sure you place the following text in the “PRICE” field:
A Great Buy at only 19.00000000001
You will notice after viewing the post that it will actually print out all that jumbo the user puts in. Our new function will correct that problem by pulling the price out of all that text and just displaying it with the proper USD currency setup. You could obviously modify this function to do whatever you wanted, but for the purpose of this tutorial we will be providing a simple example of what many of the US customers are using.
Now we are ready to setup the new function, so copy this function code into your functions.php file (between the comments in the file that tell you exactly where to place the code):
//change price to spit out correct looking currency and ignore anything that's not a price.
function cp_get_price($postid) {
	if(get_post_meta($postid, 'cp_price', true)) {
		$price_out = get_post_meta($postid, 'cp_price', true);

		// uncomment the line below to change price format
		$price_out =  ereg_replace("[^0-9.]", "", $price_out);
		$price_out = number_format($price_out, 2, '.', ',');
		$price_out = cp_pos_currency($price_out);
	} else {
		if( get_option('cp_force_zeroprice') == 'yes' )
			$price_out = cp_pos_currency(0);
		else
			$price_out = ' ';
	}
	echo $price_out;
}
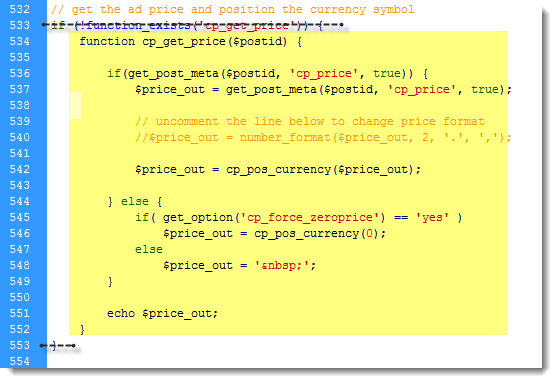
Now you might be asking, how in the world did you get all that code? The answer is simple. To modify an “existing function” you simply find the function you want to overwrite by searching through all the theme files (should be a feature of your text editor). Then copy the function and paste it into your function.php file. You should note that you DO NOT want to copy the if(!function_exists(‘#####’)), instead only copy the function on the inside (see screenshot).
Okay. Now you should have a functions.php file with a function in it (the one from above) which should correct the pricing issue we created in the sample ad we listed. Upload your functions.php file to your child theme directory and then visit the page. You will notice that it no longer displays all the junk in the price, instead it only shows the price, organized and perfect like we wanted it. Congratulations! You have just made your first ClassiPress mod using a child theme!
Step 3: Creating your own new function in the function file
Next we want to write the new function… or copy and paste a function we want to use, depending on your level of PHP experience. I have had a ton of requests for the “login on homepage panel” so I decided to give this mod away in this tutorial. Its especially usefull because it “dynamically” displays new information after you are logged in. Copy this code, add a few lines of space below the previous function and paste it in (sorry its a long one, but I really think you will like it):
/**
* HOMEPAGE DYNAMIC SIDEBAR LOGIN/REGISTRATION : here we are updating the home page sidebar
* to have a login form and display user options when logged in. Already enabled in child theme.
* USE: I suggest you replace the get_option('cp_ads_welcome_msg') on sidebar.php with our new
* function here <?php echo cp_dynamic_get_option('cp_ads_welcome_msg'); ?>.
*/
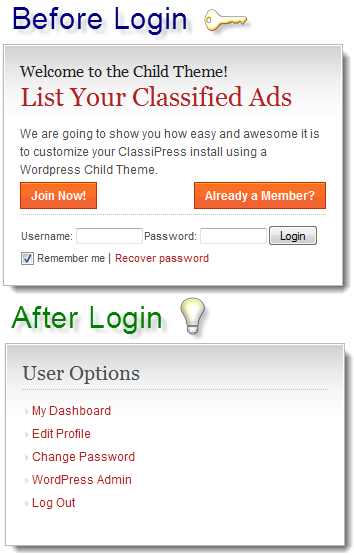
function cp_dynamic_welcome_widget($optionString) {
global $user_ID, $user_identity, $user_level;
if(!isset($optionString)) $optionString = 'cp_ads_welcome_msg';
if ( $user_ID ) {
$smHomepageSidebar = '<h2>User Options</h2>';
$smHomepageSidebar .= '<div>';
$smHomepageSidebar .= '<ul>';
$smHomepageSidebar .= '<li><a href="' . CP_DASHBOARD_URL . '">' . __('My Dashboard','cp') . '</a></li>' ;
$smHomepageSidebar .= '<li><a href="' . CP_PROFILE_URL . '">' . __('Edit Profile','cp') . '</a></li>';
$smHomepageSidebar .= '<li><a href="' . CP_PROFILE_URL . 'change_password/">' . __('Change Password','cp') . '</a></li>';
if (current_user_can('manage_options'))
$smHomepageSidebar .= '<li><a href="' . get_option('home') . '/wp-admin/">' . __('WordPress Admin','cp') . '</a></li>';
$smHomepageSidebar .= '<li><a href="' . wp_logout_url() . '">' . __('Log Out','cp') . '</a></li>';
$smHomepageSidebar .= '</ul>';
$smHomepageSidebar .= '</div><!-- /recordfromblog -->';
}
else { //if the user has no user ID then they are not logged in
$smHomepageSidebar = '<div style="padding-bottom:10px;">';
$smHomepageSidebar .= get_option($optionString); //cp_ads_welcome_msg
$smHomepageSidebar .= '<div style="float: right; text-align: center;">';
$smHomepageSidebar .= '<a href="' . get_option('home') . '/wp-login.php">' . __("Already a Member?", 'cp') . '</a><br />';
$smHomepageSidebar .= '</div>';
if (get_option('users_can_register') || get_blog_option($blog_id, 'users_can_register', 0))
$smHomepageSidebar .= '<a href="' . get_option('home') . '/wp-login.php?action=register">' . __("Join Now!", 'cp') . '</a>';
$smHomepageSidebar .= '<br />';
$smHomepageSidebar .= '</div><!-- /dotted -->';
//Create the Login Form
$smHomepageSidebar .= '<div style="margin-top: 10px;">';
$smHomepageSidebar .= '<form action="' . get_bloginfo('url') . '/wp-login.php" method="post">';
$smHomepageSidebar .= '<label style="font-size: 11px; margin-left: 1px;" for="log">Username: <input type="text" name="log" id="log" value="' . wp_specialchars(stripslashes($user_login), 1) . '" size="11" style="height: 10px; font-size: 10px;" /></label>';
$smHomepageSidebar .= '<label style="font-size: 11px; margin-left: 1px;" for="pwd">Password: <input type="password" name="pwd" id="pwd" size="11" style="height: 10px; font-size: 10px;" /></label>';
$smHomepageSidebar .= '<input style="font-size: 11px; margin-left: 1px;" type="submit" name="submit" value="Login" /><br />';
$smHomepageSidebar .= '<label style="font-size: 11px; margin-left: 1px; vertical-align:baseline; line-height: 2.1em;" for="rememberme"><input style="margin: 0; position: relative; top: 3px;" name="rememberme" id="rememberme" type="checkbox" checked="checked" value="forever" /> Remember me </label> | ';
$smHomepageSidebar .= '<a style="font-size: 11px; margin-left: 1px;" href="' . get_bloginfo('url') . '/wp-login.php?action=lostpassword">Recover password</a>';
$smHomepageSidebar .= '<input type="hidden" name="redirect_to" value="' . $_SERVER['REQUEST_URI'] . '"/>';
$smHomepageSidebar .= '</form>';
$smHomepageSidebar .= '</div>';
}
return $smHomepageSidebar;
}
Now that you have this function in your functions.php file, upload it to your child theme directory and your done with Step 3. Now it doesn’t seems like we have really accomplished anything, and that’s because this is a NEW custom function. So its not yet being called anywhere on the website. In Step 4 we will modify the sidebar.php page to use the new dynamic welcome widget function we just created.
Step 4: Modify the sidebar.
To modify the sidebar.php file, or nearly any other file in the ClassiPress root directory, you simply COPY the file and PASTE the file into your child theme. Thus, your child theme will be a set of files that identify which pages you have modified. So open your ClassiPress theme directory, find the sidebar.php file and copy it. Now go to your child theme directory and paste the sidebar.php file there. Your should now have 3 files in it:
- functions.php
- sidebar.php
- style.css
Now open the new sidebar.php file located in your child theme directory. In case versions change, do a search for the following:
<?php echo get_option('cp_ads_welcome_msg'); ?>

<a href="<?php echo get_option('siteurl'); ?>/wp-login.php?action=register"><?php _e('Join Now!', 'cp') ?></a>
When you find it we want to replace it with our new function. Replace infers that you ERASE the above code, and the place the new function in its place. Copy the code below that we are providing to make things simple for you, and place it in the spot where the above code USED to exist.
<?php
 if(function_exists('cp_dynamic_welcome_widget')) echo cp_dynamic_welcome_widget('cp_ads_welcome_msg');
 else  echo get_option('cp_ads_welcome_msg');
 ?>
So what did we just do?! Well, we replaced the normal widget you see on the homepage sidebar that says “join now” and some text that you specify in the ClassiPress settings. The function is still pulling your custom text setting you have customized for your site, but now uses it in our new function we created in the functions.php file. The exact specifics of how we created the function is outside the scope of this project, you may want to brush up on your PHP techniques if you want to write your own functions later.
Finally, we upload the sidebar.php file to the server so that your server child theme folder now has the 2 files we referenced at the beginning of this step. If you followed the tutorial correctly you should have a new dynamic widget on your homepage. In order to experience it fully, make sure you “logout” before you preview the homepage and the new sidebar widget.
This concludes Part 2 of the child theme tutorial. Make sure you stay tuned into the blog as Part 3 of the series is already underway and will feature steps explaining how to setup a favicon, build new “template pages like a new dashboard, load up new script files in the header and more!
Comments (31)
Let me know if anyone gets confused in any of the sections. I can always modify the tutorial to be more clear, especially for non-developers who are trying to work there way through the tutorial.
[…] added.This concludes Part 1 of the child theme tutorial. Now you may be ready to venture deeper in Part 2 of the series which will explain how to use the functions.php file and how it will help you modify […]
Will the child theme tutorials also work for the Jobroller theme?
Thanks for putting these together!
Well done Seth. Nice and clean tutorial.
TroyD
Hello Seth, please add this option to “login panel on homepage” in ClassiPress as standard for future releases, everyone will love it, simple as it is some people have difficulty or are no time to be testing.
Is this possible?
Its not listed as a feature request, nobody has even asked for it before. Its unlikely it will make it in 3.1. The community would need to ask for it “together” for it to be considered. Otherwise you can just use this tutorial to enable it on your site.
nice function but it seems to push down the features ad arrow and makes the site out of line. Not sure why
I’ve used this mod on multiple sites without a problem. You sure you followed the tutorial correctly?
i’ve tried inserting code in normal theme – functions php, then sidebar, the widget changes when logged in but shows fatal error when not logged in – i put the appropriate code as above in both theme files, just not as a child theme, can it still be used?
It can be used without a child theme, but I’m not sure it can be used EXACTLY as above, you might have to do some troubleshooting.
Hi Seth, thank you for very nice tutorial, everything works find but the btn_orange is not coming out…do you know whats wrong with that? or do i need to put obtn btn_orange somwhere on the code? thanks a lot
it’s bit funny too, I need to remove this code:
function cp_dynamic_welcome_widget($optionString) {
If im not remove it its always show error :
Parse error: parse error in C:\xampp\htdocs\pcdwp\wp-content\themes\classipress_child\functions.php on line 81
but when i remove it, everything works fine except there is no orange button on the “Join Now” and “Already Member” links, any suggestion Seth?
Thanks
I have to think its something with your local xampp install. Several people have used this tutorial without any issue, and I know for a fact that function works because I’m using it on my own site exactly as shown here which you can preivew at http://cpmodlite.smwphosting.com/
I have a similar problem as well. I followed the tutorial, but the widget that is suppose to let me sign in says “Fatal error: Call to undefined function get_blog_option() in /home/tmtu2/public_html/wp-content/themes/postudent_child/functions.php on line 60”
Hi TY,
I was getting the same error and what I did to fix it was go into my wordpress settings, and enable the anyone can sign up option.
If you have that unticked you get the error – ticked no error.
You can try “get_option” instead of “get_blog_option”, but if your running wordpress 3.0 or higher both should work.
http://codex.wordpress.org/Function_Reference/get_option
http://codex.wordpress.org/WPMU_Functions/get_blog_option
Is Step 4 correct?
It says…
Now go to your child theme directory… Your should now have 2 files in it:
1. functions.php
2. sidebar.php
Shouldn’t it say, “Your child theme directory should now have 3 files in it: functions.php, sidebar.php, and styles.css”?
you are correct
I don’t know what went wrong. I did this tutorial, then upgraded to 3.0.4, and now all of the prices on the site say $0 except for the individual listing pages (I think they’re called single.php). 🙁
Not sure, I wrote the tutorial and functions based on 3.0.4 so there shouldn’t be any problem with the code above to my knowledge.
Something’s really amiss. If I edit classipress/includes/theme-functions.php file directly, then the prices work.
How can I get a 100% confirmation that the classipress_child/functions.php file is being loaded and read from properly?
make a PHP error, if its being loaded it will spit out an error with the line number. for example use a function that doesn’t exists:
php-no-function();
Well, I have to compliment you on the tutorial. You were thorough and it’s demystified child themes to an extent for me, but I just went through all the steps again (beginning in part 1) and it’s the same problem. Neither of the two functions we created in part 2 — cp_get_price() and cp_dynamic_welcome_widget() — work.
I guess it’s as true in life and it is in CP… children aren’t for everyone.
I just followed the tutorial… even copied the code from this tutorial and used it in my clients website today, had no problems, fixed up my price with no problem. Sounds like you may need to contact one of the premium partners for a consultation.
Figured it out! I dunno what was going on, but at the end of part 1 it wasn’t *activating* the new child theme when I’d click activate. It would keep the icon for CP 3.0.4 as the current theme and I assumed that was normal. Today it’s now putting my “ClassiPress – Child Theme 3.0.4” as the active theme and now the functions work… well almost!
Can you confirm that this screenshot — http://appthemes.com/wp-content/uploads/2010/09/cp-tutorial-part2-img5.png — is accurate? On mine, it’s not showing the orange buttons. Instead it shows only text.
Yes, I can confirm the button styles pull through, you must have some CSS thats over-writing the styles of the button. Sounds like a little bit of CSS style tweaking and your are set!
Correct me if I’m wrong, but I just realized a potential problem to using child themes. Taking this tutorial as an example, we have created our own custom version of sidebar.php. The ClassiPress theme now knows that it should use *our* sidebar.php and disregard the actual ClassiPress sidebar.php theme file.
What happens when a future version of ClassiPress comes out and it has an updated sidebar.php file? We’ll never know this because the theme will still be loading our old child-theme sidebar.php
Do I understand this correctly or will future updates still load their changes in the new files in addition to our child-theme files?
yes, that is a “limitation” as it is with all wordpress child themes as well as the theory behind all “override” functions in object oriented programming.
I’ve come across another problem with child themes that stems from step 4 of this tutorial.
I can duplicate files from the original theme and put them in the classipress_child directory and edit them and the pages update accordingly (just as with the sidebar.php as demonstrated in this tutorial).
The problem comes with files that are in sub-directories of the classipress core files. For example, when someone is viewing a single ad, the contact form says, “To inquire about this ad listing, complete the form below to send a message to the ad poster.” The file that is displaying this text is located here: classipress/includes/sidebar-contact.php
I want the form to say, “Contact The Seller”, therefore I must put a copy of classipress/includes/sidebar-contact.php in my classipress_child folder.
If I put it directly in the classipress_child folder or put it in classipress_child/includes neither way works.
How do you include sub-directory files in the child theme?
Again, you are correct with your assumptions and issues. Not ALL of classipress is perfectly “child theme enabled”. Its not your standard wordpress theme. The way wordpress and child themes works, only allows files expected by wordpress to function in the regards you express above. Files that are not expected by wordpress… well wordpress doesn’t handle them at all, so nothing in your child theme folder’s sub folders will be loaded like that.
The purpose of the tutorial was to give insite and ability to make MANY modifications that could be implimented while making upgrades easier. You still have to worry about whats in your files, nothing is upgrade proof. Thats like thinking all wordpress plugins will magically work with all versions of wordpress. Its just not the case, your “mods” and like plugins, and must be upgraded with new versions of classipress, but its much easier then trying to manage 2 complete sets of core files during an upgrade.
Hi Seth,
congrats for this helpful series of tutorial, I cannot way until Part 3!
Anyway, I’ve got a little question for you. As I am going to mod your theme by creating a Child Theme I would like to understand also what is possible to do with it.
For example, I have developed a little js file able to give little customizations to your template for satisfy my design needs. Now I know that for load a js file WP uses the wp_enqueue_script() function, and within your theme is present a cp_load_scripts() function to create a list of scripts files to be loaded.
My question now is, shall I create a include/ folder with the file that I am looking for and edit it inside my child theme folder or shall I override the previous function inside my functions.php file in my Child Theme folder?
But if I have to edit more than one function how can I do that without increase the functions.php size and trying to keep my code as tidy as possible? Shall I use the functions.php file to include external files in order to keep it in order?
Thanks in advance for your answer!
For anyone interested in this topic I’ve open a thread in the Support Forum, the link is http://appthemes.com/forum/showthread.php/12052-Customize-ClassiPress-through-Child-Theme?p=52316#post52316
Hope you’ll going to find it helpful!
Discussion is closed.